Improve SEO with a CDN
One guilty pleasure I have is not going past page 1 of a search results page – I mean, why would I? It’s the equivalent of going to the supermarket, everything is there so I don’t need to search elsewhere.
This is how users think, they won’t bother going to page 2, 3, or 4, instead they’ll hit the links at the top of page 1. It’s not just users either, web crawlers view your site based on a number of conditions, a few of which are important in how your pages are ranked.
This is where a CDN comes in handy by taking your content, dispersing it across a global network infrastructure, and then delivering it to end users at super fast speeds – However, it’s important to adjust your settings so search engines can grab your assets and push them to the top of the results page. In this post we will look at how to improve SEO with CDN.
Canonical Headers
Canonical headers tell the browser your asset origin, this helps to avoid content duplication in search engines. Think of them as a return mailing address, pointing towards the original source.
Assets don’t have this option enabled by default on the CDN, so you will have to switch it on by doing the following.
-
Advanced Settings
Select the option “Add an canonical link to your assets?” within CDNify’s advanced settings.
-
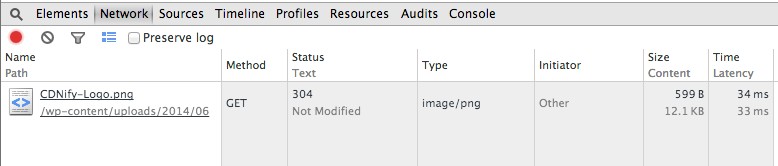
Checking an Asset
View an asset that’s on the CDN, e.g. “yoursite.a.cdnify.io/image.png”. Right-click the asset and select “Inspect Element”. In the developer tools hit “Network” and click on your asset’s name.
-
Response Headers
Under “Response Headers” you will see “Link”, it should look like the following – Link:
When web crawlers see the canonical header they will mark the files as only existing on the CDN which helps when search engines index files, this stops content duplication and flagging it as spam.
Alternatively if you want to manage your canonical headers on the origin server then use the following code within your .htaccess file.
<FilesMatch "\.(ico|pdf|flv|jpg|jpeg|png|gif|js|css|swf|webp|html)(\.gz)?(\?.*)?$">

<IfModule mod_rewrite.c>

RewriteEngine On

RewriteCond %{HTTPS} !=on

RewriteRule .* - [E=CANONICAL:http://%{HTTP_HOST}%{REQUEST_URI},NE]

RewriteCond %{HTTPS} =on

RewriteRule .* - [E=CANONICAL:https://%{HTTP_HOST}%{REQUEST_URI},NE]

</IfModule>

<IfModule mod_headers.c>

Header set Link "<%{CANONICAL}e>; rel=\"canonical\""

</IfModule>

</FilesMatch>
If you want to specify a single asset’s origin on the fly then use –
<img src="”https://yoursite.a.cdnify.io/image.png”" alt="" />
Robots.txt
Robots.txt is a file that restricts access to your site by web crawlers, stopping pages from being indexed on search engine results. The first thing a crawler looks at then landing on a page is to check this file, it does so to see if there are any specific pages or paths that shouldn’t be touched, along with any other conditions you want the crawler to abide by.
In the case of a CDN, assets are mirrored, so content is duplicated and then listed by crawlers on search engines, which is bad as pages rank lower.
Fix this issue by using CDNify’s advanced settings which adds a robots.txt on your resource.
-
Advanced Settings
Select the option “Stop robots from indexing your resource on the CDN?” within CDNify’s advanced settings.
-
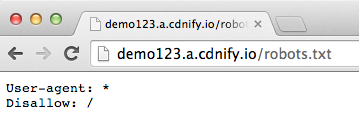
Check Robots.txt
Check your resource, e.g. “yoursite.a.cdnify.io/robots.txt” – It will show “Dissallow”, meaning web crawlers can’t index your CDN’ed content.
Alternatively to stop bots crawling your origin server files then add a robots.txt file on your root public_html directory. Depending on what you want to do you can either:
Disallow indexing of everything:
User-agent: *

Disallow: /
Disallow indexing of specific directories:
User-agent: *

Disallow: /yourpage.html
Disallow indexing of specific paths:
User-agent: *

Disallow: /yourpath/
For a full rundown of more commands and what you can do to either stop or allow bots from crawling your origin, then check out Google’s Robots.txt Specifications.
CORS Headers
Cross-Origin Resource Sharing (CORS) headers are a way for search engines and browsers to know the origin of the resource and subsequently all it’s assets.
Switch CORS headers on within CDNify’s advanced settings.
-
Advanced Settings
Select the option “Enable CORS headers?” within CDNify’s advanced settings so the origin of the assets are set in the access control header.
-
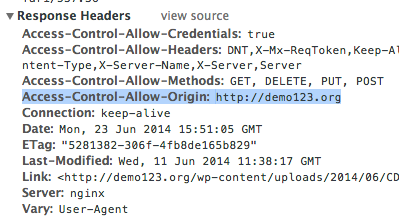
Viewing an Asset
Check that CORS headers is working by viewing an asset that’s on the CDN, e.g. “yoursite.a.cdnify.io/image.png”. Right-click the asset and select “Inspect Element”. In the developer tools hit “Network” and click on your asset’s name.
-
Response Headers
Within the Headers tab under Response Headers you should see “Access-Control-Allow-Origin: http://yoursite.com”, this tells search engines that your assets came from the origin.
Alternatively you can check within the command line (Terminal for Mac, MS-DOS for Windows, and Bash for Linux). Input:
curl -I https://yourresource.a.cdnify.io
It will show the same access control header info as the browser.
For a further explanation of how to use robots.txt, canonical headers, and CORS headers, then check the CDNify Learn Section.